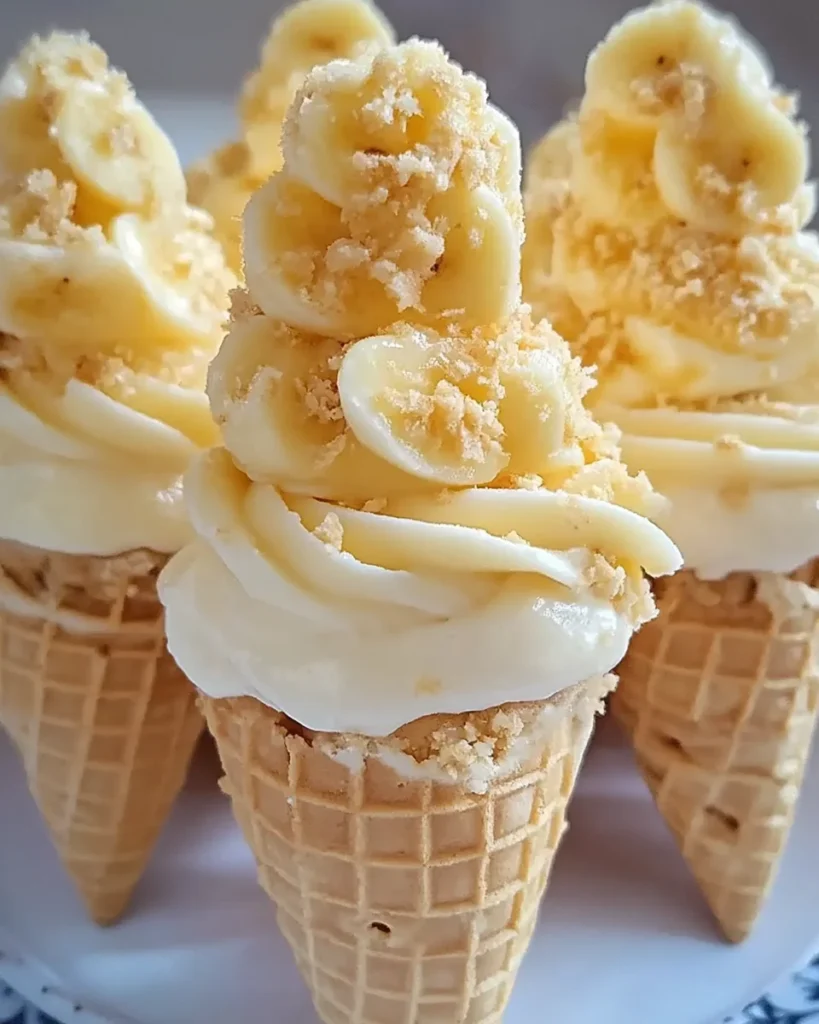
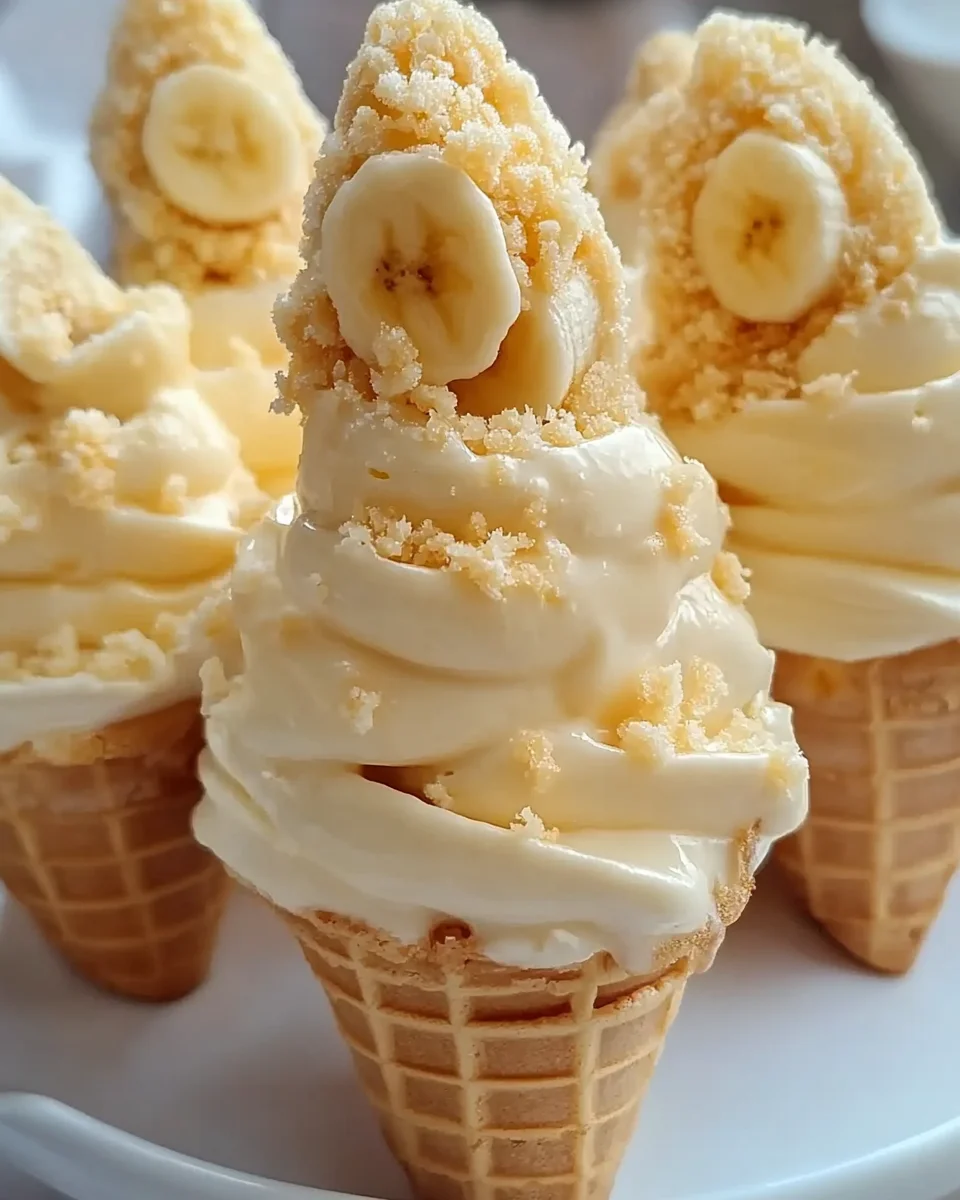
Banana Pudding Cheesecake Cones are a delightful treat that combines the classic flavors of banana pudding with the fun and portability of waffle cones. Perfect for parties, picnics, or a sweet indulgence at home, these cones are sure to impress your guests. With layers of creamy cheesecake filling, fresh bananas, and crushed vanilla wafers, they offer a unique twist on a beloved dessert.
Why You’ll Love This Banana Pudding Cheesecake Cones
These cones are not just delicious; they also come with numerous benefits.
- Easy to Make: With simple ingredients and quick steps, you can whip these up in no time.
- Flavor Packed: The combination of banana cream and cheesecake creates an irresistible flavor.
- Perfect for Any Occasion: Whether it’s a family gathering or a summer barbecue, these cones are a hit.
- Customizable: Feel free to add your favorite toppings or adjust the layers to suit your taste.
- Fun Presentation: These cones look impressive and are easy to serve, making them party-ready.
Tools and Preparation
Having the right tools makes preparing Banana Pudding Cheesecake Cones effortless.
Essential Tools and Equipment
- Mixing bowls
- Electric mixer
- Whisk
- Measuring cups
- Spoon or piping bag
Importance of Each Tool
- Mixing bowls: Essential for combining ingredients without spilling.
- Electric mixer: Helps achieve a smooth cheesecake filling quickly.
- Piping bag: Makes it easy to fill the cones neatly without mess.
Ingredients
For the Base
- 6 waffle cones
- 1 (3.4 oz) box instant banana cream pudding mix
- 1½ cups cold milk
For the Cheesecake Filling
- 1 (8 oz) package cream cheese, softened
- 1 cup powdered sugar
- 1 teaspoon vanilla extract
- 1½ cups whipped topping (like Cool Whip)
For Layering
- 1 cup crushed vanilla wafer cookies
- 2 bananas, sliced
For Garnish
- Additional whipped topping and crushed wafers for garnish

How to Make Banana Pudding Cheesecake Cones
Step 1: Prepare the Pudding
In a mixing bowl, whisk together the instant banana pudding mix and cold milk until smooth and slightly thickened. Set aside to chill for about 5 minutes.
Step 2: Make the Cheesecake Filling
In a separate bowl, beat the softened cream cheese until smooth. Add in powdered sugar and vanilla extract. Mix until fully combined.
Step 3: Combine Mixtures
Fold the prepared pudding into the cream cheese mixture gently. Then add in whipped topping until everything is smooth and fluffy.
Step 4: Layer the Cones
Spoon or pipe a layer of cheesecake filling into each waffle cone’s bottom. Add a few banana slices and sprinkle with crushed vanilla wafers.
Step 5: Repeat Layers
Add another layer of filling followed by more banana slices and wafer crumbs. Fill each cone generously to the top.
Step 6: Garnish
Top each cone with a dollop of whipped topping and sprinkle with crushed vanilla wafers for an attractive finish.
Step 7: Chill Before Serving
Refrigerate the cones for at least 30 minutes before serving. This allows them to set nicely and enhances their flavors. Enjoy your delicious Banana Pudding Cheesecake Cones!
How to Serve Banana Pudding Cheesecake Cones
Banana Pudding Cheesecake Cones are a delightful treat that can be served in various ways. These cones are perfect for parties, picnics, or simply enjoying at home. Here are some creative serving ideas to enhance your dessert experience.
Individual Dessert Cups
- Serve each cone in a small dessert cup for easy handling and an attractive display.
Topped with Fresh Fruit
- Add an extra layer of freshness by topping the cones with additional banana slices or other fruits like strawberries or blueberries.
Chocolate Drizzle
- Enhance the flavor with a drizzle of melted chocolate over the whipped topping for a decadent touch.
Mini Cones
- Consider making mini versions of these cones for bite-sized treats that are perfect for parties or gatherings.
Ice Cream Pairing
- Serve alongside a scoop of vanilla ice cream to complement the creamy cheesecake filling.
How to Perfect Banana Pudding Cheesecake Cones
Creating the perfect Banana Pudding Cheesecake Cones is easier with these helpful tips. Follow these suggestions to elevate your dessert game!
- Use ripe bananas: Choose bananas that are perfectly ripened for optimal sweetness and flavor in your cones.
- Chill before serving: Allowing the cones to chill for at least 30 minutes helps the flavors meld and provides a refreshing taste.
- Whip cream cheese thoroughly: Make sure the cream cheese is well-beaten before combining with other ingredients for a smooth cheesecake filling.
- Layer strategically: Alternate layers of filling, bananas, and crushed wafers to ensure every bite is packed with flavor and texture.
- Customize toppings: Feel free to get creative with toppings like caramel sauce, nuts, or even sprinkles for added fun!
Best Side Dishes for Banana Pudding Cheesecake Cones
Pairing side dishes with your Banana Pudding Cheesecake Cones can create a well-rounded meal. Here are some delicious options that complement this sweet treat perfectly.
- Fresh Fruit Salad: A mix of seasonal fruits adds freshness and balances out the sweetness of the cones.
- Vanilla Ice Cream: Creamy vanilla ice cream pairs wonderfully, offering a classic combination of flavors.
- Chocolate Chip Cookies: These cookies add a crunchy texture and rich chocolate flavor that enhances the dessert experience.
- Peanut Butter Cookies: The nutty flavor from peanut butter cookies offers a delightful contrast to the creamy cheesecake.
- Milkshakes: A simple vanilla or banana milkshake makes for a fun beverage choice that complements the cones.
- Coffee or Tea: Serving warm beverages like coffee or tea can provide a comforting finish to your sweet treat.
Common Mistakes to Avoid
When making Banana Pudding Cheesecake Cones, it’s easy to make a few common errors. Here are mistakes to watch out for.
- Skipping the chilling step: Not allowing the cones to chill can result in a runny filling. Always refrigerate for at least 30 minutes.
- Using warm ingredients: Mixing warm cream cheese can create lumps. Make sure your cream cheese is softened but not melted.
- Overfilling the cones: Stuffing too much filling can lead to messiness. Fill the cones generously, but leave a little space at the top.
- Ignoring banana browning: Sliced bananas can brown quickly. If preparing ahead, toss slices in lemon juice to keep them fresh longer.
- Not adjusting sweetness: Everyone’s taste differs. Taste your mixture and adjust powdered sugar as needed before layering.
Storage & Reheating Instructions
Refrigerator Storage
- Store cones in an airtight container for up to 2 days.
- Keep the whipped topping separate until ready to serve for best texture.
Freezing Instructions
- These cones are best enjoyed fresh but can be frozen for up to 1 month.
- Wrap each cone tightly in plastic wrap and then place them in a freezer-safe bag.
Reheating Instructions
- Oven: Not recommended, as these cones are best served cold.
- Microwave: Avoid microwaving, as it can make the cone soggy.
- Stovetop: Not suitable; enjoy directly from the fridge.

Frequently Asked Questions
What are Banana Pudding Cheesecake Cones?
Banana Pudding Cheesecake Cones are delightful desserts combining layers of banana pudding and cheesecake filling in crispy waffle cones, perfect for any occasion.
Can I customize my Banana Pudding Cheesecake Cones?
Yes! You can add different fruits or swap the vanilla wafers with other cookies for varied flavors and textures.
How long do Banana Pudding Cheesecake Cones last?
These cones last about 2 days in the refrigerator, but they taste best when eaten fresh.
Can I make Banana Pudding Cheesecake Cones ahead of time?
Absolutely! You can prepare them a few hours in advance; just remember to chill them before serving.
Final Thoughts
Banana Pudding Cheesecake Cones are a fun twist on traditional desserts, offering rich flavors and textures that everyone will love. They’re easy to customize with various toppings or flavors, making them perfect for parties or casual gatherings. Try this recipe today!

Leave a Comment