
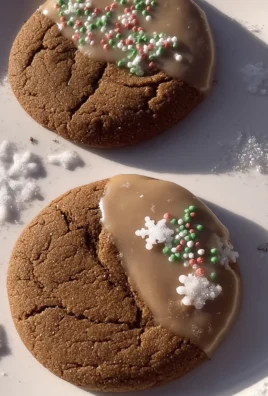
Christmas Royal Icing Cookies are a delightful centerpiece for your holiday celebrations. These cookies shine with stunning decorations made from vibrant royal icing, making them perfect for gifting or sharing at festive gatherings. Not only are they a treat to eat, but the decorating process is also an enjoyable activity for family and friends. With their charming designs, these cookies capture the spirit of Christmas and add a sweet touch to any occasion.

Why You’ll Love This Recipe
- Fun for All Ages: Decorating Christmas Royal Icing Cookies is a fantastic way to bring everyone together. Kids and adults alike will enjoy the creative process.
- Customizable Designs: With various food colors, you can create unique themes or match your holiday decor. Personalize each cookie to suit different tastes!
- Perfect for Gifting: These beautifully decorated cookies make thoughtful homemade gifts. Package them up in festive boxes for friends and loved ones.
- Delicious Flavor: The buttery flavor of these cookies combined with the sweetness of royal icing creates a delicious treat that everyone will love.
- Ideal for Any Occasion: While perfect for Christmas, these cookies can be decorated for birthdays, weddings, or any celebration throughout the year.
Tools and Preparation
Before diving into your cookie-making adventure, gather the essential tools needed for creating your Christmas Royal Icing Cookies. Having everything ready will make the process smoother and more enjoyable.
Essential Tools and Equipment
- Rolling pin
- Cookie cutters
- Parchment paper
- Mixing bowls
- Electric mixer
- Piping bags and tips
Importance of Each Tool
- Rolling pin: A good rolling pin helps you achieve an even thickness when rolling out dough, ensuring perfectly baked cookies.
- Electric mixer: This tool makes it easy to cream butter and sugar quickly, saving time and effort in the mixing process.
- Piping bags: Using piping bags allows for precise decorating of your royal icing, making it easy to create intricate designs.
Ingredients
For the Cookies
- 2 ¾ cups all-purpose flour
- 1 teaspoon baking powder
- ½ teaspoon salt
- 1 cup unsalted butter, softened
- 1 ½ cups granulated sugar
- 1 large egg
- 1 teaspoon vanilla extract
- 1 teaspoon almond extract (optional)
For the Royal Icing
- 4 cups powdered sugar
- 3 tablespoons meringue powder
- ½ cup water (plus more as needed)
- Food coloring (various colors for decorating)

How to Make Christmas Royal Icing Cookies
Step 1: Make the Cookie Dough
In a medium bowl, whisk together the flour, baking powder, and salt. In a large mixing bowl, cream together the softened butter and granulated sugar until light and fluffy. Beat in the egg along with vanilla extract and almond extract if using. Gradually add in the dry mixture until just combined.
Step 2: Chill the Dough
Divide the dough into two discs, wrap each disc in plastic wrap, and refrigerate them for at least 1 hour until firm.
Step 3: Preheat the Oven
Preheat your oven to 350°F (175°C).
Step 4: Roll Out the Dough
On a lightly floured surface, roll out one disc of dough to about ¼ inch thickness. Use cookie cutters to cut out desired shapes. Place each cookie on a parchment-lined baking sheet.
Step 5: Bake the Cookies
Bake in your preheated oven for 8-10 minutes or until edges are lightly golden. Remove from oven and let cool completely on a wire rack.
Step 6: Make the Royal Icing
In a mixing bowl, combine powdered sugar, meringue powder, and water. Beat on low speed until mixed; then increase to medium-high speed until stiff peaks form (about 5-7 minutes). Divide icing into smaller bowls and tint with food coloring as desired.
Step 7: Decorate the Cookies
Use piping bags fitted with different tips to decorate cooled cookies with royal icing. Allow icing to dry completely—ideally overnight—before storing or displaying.
Step 8: Serve and Enjoy
These beautifully crafted Christmas Royal Icing Cookies are perfect for sharing during holiday festivities or as special gifts!
How to Serve Christmas Royal Icing Cookies
Christmas Royal Icing Cookies are a delightful treat that can be enjoyed in various ways. Whether you’re hosting a holiday party or looking for a festive gift, these cookies can be served in style to impress your guests.
Cookie Platters
- Arrange an assortment of decorated cookies on a festive platter. Use seasonal decorations like holly leaves or ribbons to enhance the presentation.
Gift Boxes
- Pack individual cookies into decorative boxes or tins. These make wonderful gifts for friends and family during the holiday season.
Dessert Tables
- Include these cookies as part of a larger dessert table at your holiday gatherings. Pair them with other sweets for a colorful display.
Hot Cocoa Pairing
- Serve the cookies alongside hot cocoa or eggnog for a cozy treat. The sweetness of the icing complements warm beverages perfectly.
Kids’ Cookie Decorating Party
- Organize a cookie decorating event for children. Provide additional icing and sprinkles so they can create their own masterpieces.
How to Perfect Christmas Royal Icing Cookies
To ensure your Christmas Royal Icing Cookies turn out beautifully, consider these helpful tips.
- Use Room Temperature Ingredients: Ensure butter and eggs are at room temperature for better mixing and texture.
- Chill the Dough: Chilling the dough prevents spreading during baking, allowing you to maintain those beautiful shapes.
- Achieve Stiff Peaks: When making royal icing, beat it until stiff peaks form. This ensures your designs hold their shape.
- Color Carefully: Start with a small amount of food coloring when tinting icing. You can always add more to achieve your desired shade.
- Allow Drying Time: Let the decorated cookies dry completely overnight before stacking or packaging them to prevent smudging.
- Practice Piping Techniques: Experiment with different piping tips to create unique designs and textures on your cookies.

Best Side Dishes for Christmas Royal Icing Cookies
Complement your Christmas Royal Icing Cookies with delicious side dishes that enhance the festive experience. Here are some great options to consider.
-
Festive Fruit Salad
A mix of seasonal fruits like pomegranates, oranges, and apples adds freshness to balance the sweetness of the cookies. -
Cheesecake Bites
Mini cheesecake bites with toppings like chocolate or fruit provide a rich contrast to the lightness of the cookies. -
Spiced Nuts
Roasted nuts seasoned with cinnamon and sugar offer a crunchy texture that pairs well with sweet treats. -
Chocolate Fondue
Set up a chocolate fondue station where guests can dip fruits, marshmallows, and even cookie pieces into warm chocolate. -
Eggnog Mousse
A creamy eggnog mousse adds a festive touch and complements the flavors of holiday baked goods beautifully. -
Gingerbread Trifle
Layered gingerbread cake with whipped cream creates a delightful dessert that aligns perfectly with holiday themes.
Common Mistakes to Avoid
Making Christmas Royal Icing Cookies can be a delightful experience, but there are common pitfalls to watch out for.
- Skipping the chill time: Not refrigerating the dough can lead to cookies that spread too much while baking. Always chill the dough for at least 1 hour.
- Incorrect icing consistency: If your royal icing is too thin, it won’t hold its shape. Ensure it reaches stiff peaks before decorating.
- Overbaking the cookies: Baking for too long results in hard cookies. Keep an eye on them and only bake until the edges are lightly golden.
- Not using parchment paper: Placing cookies directly on a baking sheet may cause sticking. Use parchment paper for easy removal and cleanup.
- Ignoring food coloring instructions: Adding too much color can affect icing consistency. Start with a small amount and mix well before adding more.
Storage & Reheating Instructions
Refrigerator Storage
- Store cookies in an airtight container to maintain their freshness.
- They will last up to 1 week when stored properly in the refrigerator.
Freezing Christmas Royal Icing Cookies
- Wrap each cookie individually in plastic wrap, then place them in a freezer-safe container.
- Cookies can be frozen for up to 3 months without losing quality.
Reheating Christmas Royal Icing Cookies
- Oven: Preheat to 300°F (150°C) and warm cookies for about 5 minutes. This method keeps them crisp.
- Microwave: Heat one cookie at a time for about 10 seconds. Be careful not to overheat, as they can become chewy.
- Stovetop: Place a heatproof dish over low heat and warm cookies gently for 2-3 minutes.

Frequently Asked Questions
What are Christmas Royal Icing Cookies?
Christmas Royal Icing Cookies are festive sugar cookies decorated with colorful royal icing, perfect for holiday gatherings.
How do I achieve the best royal icing consistency?
To get the perfect consistency, mix until stiff peaks form, then add water gradually if it’s too thick.
Can I customize my Christmas Royal Icing Cookies?
Absolutely! You can use different flavors of extracts or food coloring to create unique designs and tastes.
How long do decorated cookies stay fresh?
When stored properly, decorated Christmas Royal Icing Cookies remain fresh for about one week at room temperature.
Final Thoughts
These Christmas Royal Icing Cookies are not just delicious; they are also a wonderful canvas for creativity during the holiday season. Experiment with different designs and flavors to make them your own! Enjoy sharing these charming treats with family and friends!

Christmas Royal Icing Cookies
Christmas Royal Icing Cookies are the quintessential holiday treat, combining delicious buttery sugar cookies with vibrant royal icing decorations that capture the spirit of the season. Perfect for sharing or gifting, these cookies provide a fun baking activity for families and friends to enjoy together. With customizable designs, you can create cookies that reflect your unique holiday style, making them ideal for any festive gathering. Whether arranged on a platter or packaged in decorative boxes, these charming treats will surely delight everyone who tastes them.
- Total Time: 40 minutes
- Yield: Approximately 24 cookies 1x
Ingredients
- 2 ¾ cups all-purpose flour
- 1 teaspoon baking powder
- ½ teaspoon salt
- 1 cup unsalted butter, softened
- 1 ½ cups granulated sugar
- 1 large egg
- 1 teaspoon vanilla extract
- 4 cups powdered sugar
- 3 tablespoons meringue powder
- ½ cup water (plus more as needed)
- Food coloring (various colors for decorating)
Instructions
- In a medium bowl, whisk together flour, baking powder, and salt.
- In a large bowl, cream butter and sugar until light and fluffy. Beat in the egg and extracts.
- Gradually add dry mixture until just combined. Divide dough into discs, wrap in plastic wrap, and refrigerate for at least 1 hour.
- Preheat oven to 350°F (175°C). Roll out chilled dough to ¼ inch thick and cut shapes with cookie cutters. Place on parchment-lined baking sheets.
- Bake for 8–10 minutes until edges are lightly golden. Cool on wire racks.
- For royal icing, beat powdered sugar, meringue powder, and water until stiff peaks form; tint with food coloring as desired.
- Decorate cooled cookies with icing and allow to dry completely before serving.
- Prep Time: 30 minutes
- Cook Time: 10 minutes
- Category: Dessert
- Method: Baking
- Cuisine: Holiday
Nutrition
- Serving Size: 1 cookie
- Calories: 130
- Sugar: 10g
- Sodium: 45mg
- Fat: 6g
- Saturated Fat: 4g
- Unsaturated Fat: 2g
- Trans Fat: 0g
- Carbohydrates: 18g
- Fiber: <1g
- Protein: 1g
- Cholesterol: 15mg

Leave a Comment