Red, White and Blue Dirt Cups are a delightful dessert that perfectly captures the spirit of celebration. Ideal for the 4th of July or any patriotic event, these layered cups combine creamy pudding and crunchy Oreos into a fun treat. The vibrant colors make them visually appealing, while their simple preparation ensures everyone can enjoy this sweet indulgence without fuss.
Why You’ll Love This Red, White and Blue Dirt Cups
Red, White and Blue Dirt Cups are not just tasty; they offer several standout features:
- Easy to Make: With minimal effort, you can whip up these delicious cups in just 10 minutes.
- Fun for All Ages: Kids and adults alike will love digging into their own cup of layered goodness.
- Versatile Presentation: Perfect for any patriotic occasion, these cups can be decorated differently to suit your event.
- No Baking Required: This no-bake dessert means less time in the kitchen and more time enjoying with friends and family.
- Customizable Ingredients: Feel free to switch up the colors or toppings based on your preferences or what you have on hand.
Tools and Preparation
Before you dive into making Red, White and Blue Dirt Cups, gather your tools for an efficient baking experience.
Essential Tools and Equipment
- Mixing bowl
- Whisk
- Clear plastic cups (9oz)
- Measuring spoons
Importance of Each Tool
- Mixing bowl: A large mixing bowl is essential for combining the pudding ingredients thoroughly.
- Whisk: A whisk allows for quick mixing, ensuring your pudding is smooth and lump-free.
- Clear plastic cups (9oz): These showcase the colorful layers beautifully while being easy to handle.
Ingredients
Pudding Base
- Cheesecake Pudding Mix
- Milk
Toppings and Layers
- Oreo Cookies, crushed
- Red & Blue Gel Food Coloring
- Red & Blue Gummy Worms
- Flag Cupcake Toppers
Serving Containers
- Clear Plastic Cups, 9oz

How to Make Red, White and Blue Dirt Cups
Step 1: Prepare the Pudding
- Place both boxes of cheesecake pudding mix in a large mixing bowl.
- Add milk to the bowl.
- Whisk until the pudding thickens to your desired consistency.
Step 2: Color Your Pudding
- Transfer 1 cup of pudding into a separate bowl.
- In another bowl, leave 1 ½ cups of pudding.
- Add blue gel food coloring to the first bowl with 1 cup of pudding; stir until no streaks remain.
- Add red gel food coloring to the second bowl with 1 ½ cups of pudding; stir until fully mixed.
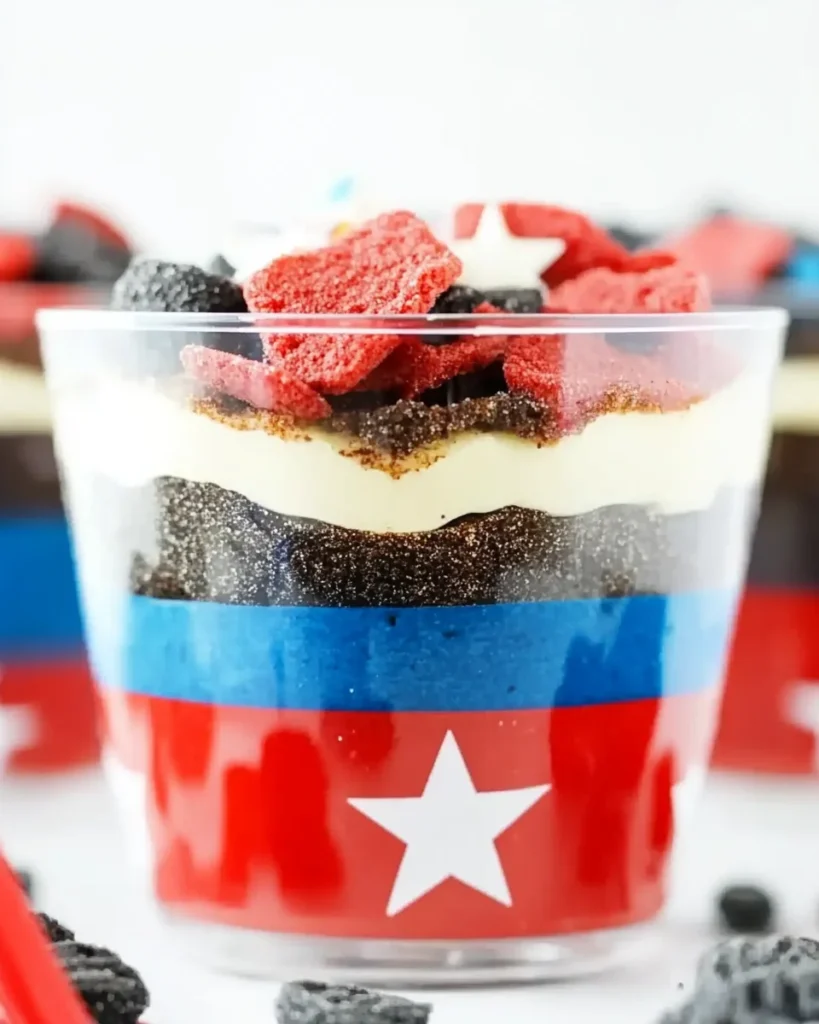
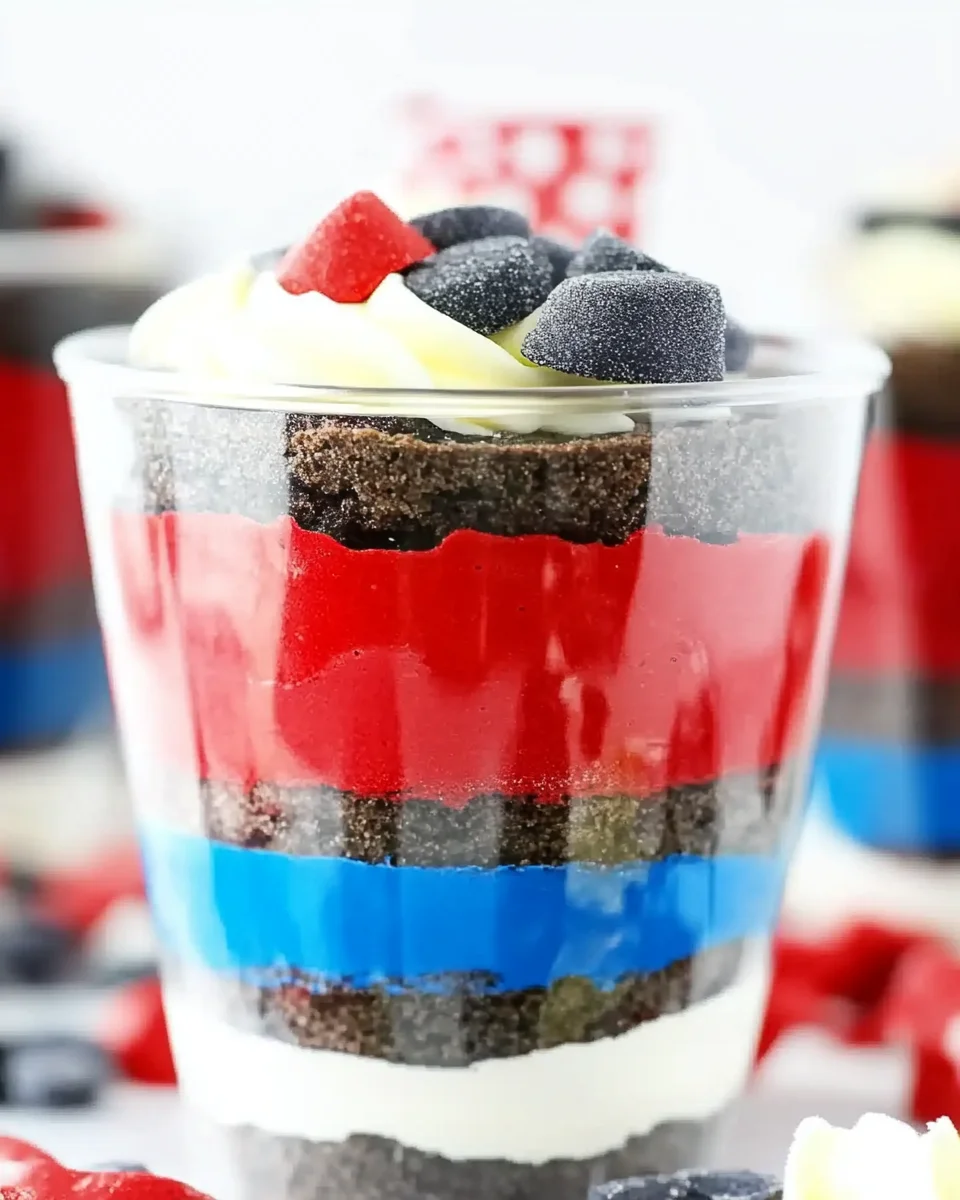
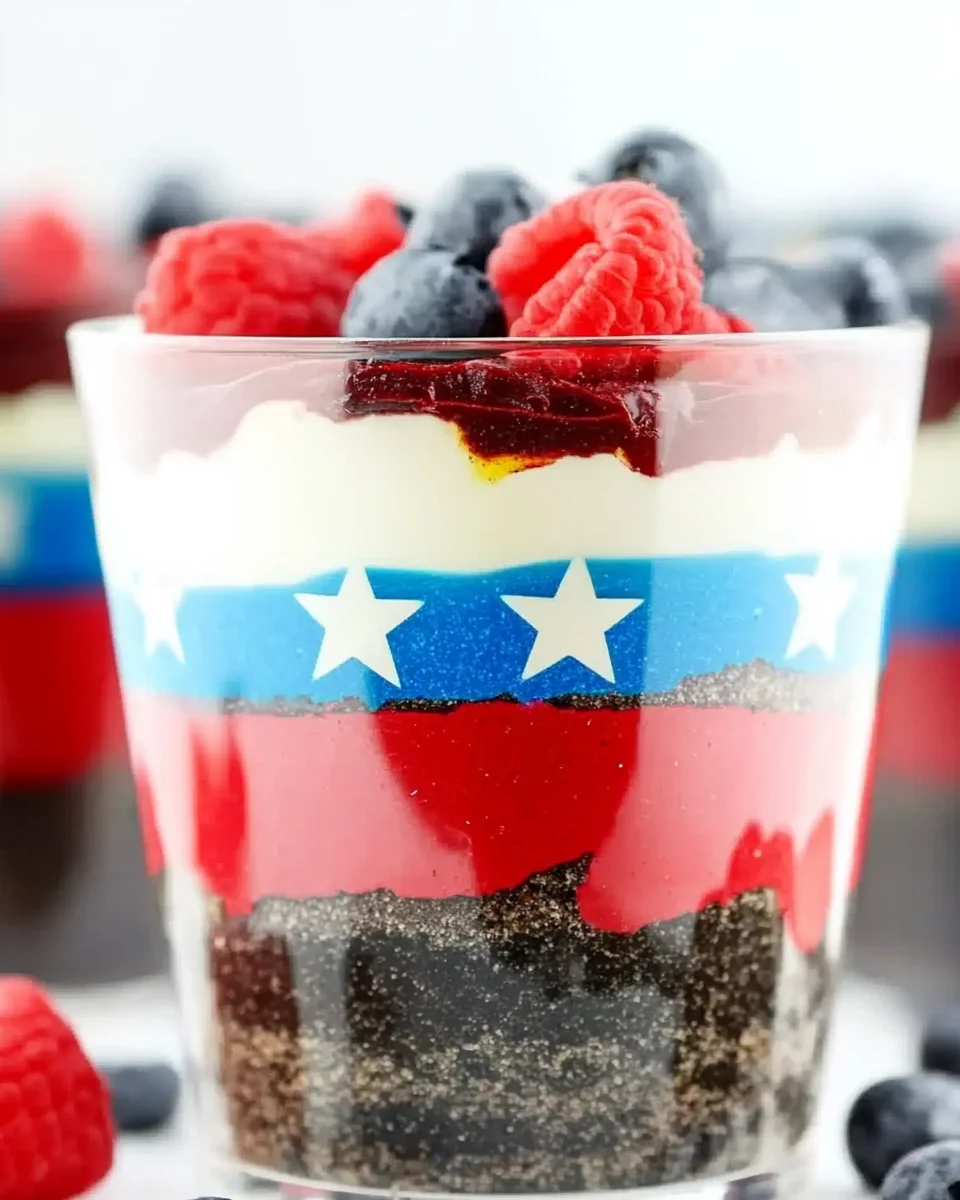
Step 3: Layer Your Dirt Cups
- Line up your clear plastic cups.
- In each cup, add 1 tablespoon of crushed Oreos at the bottom; spread evenly across the base.
- On top of that layer, add 2 tablespoons of blue pudding; gently spread it out evenly.
- Follow with another tablespoon of crushed Oreos; spread evenly again.
- Next, add 3 tablespoons of white pudding as another layer; smooth it out evenly.
- Continue with 1 ½ tablespoons more of white pudding; ensure it’s spread evenly across this layer.
- Add the final layer with 4 tablespoons of red pudding; spread evenly across each cup.
- For the last touch, top each cup with 2 tablespoons of crushed Oreos for crunchiness.
- Finish by adding two gummy worms and one flag per cup for decoration before serving!
Enjoy these delightful Red, White and Blue Dirt Cups at your next gathering!
How to Serve Red, White and Blue Dirt Cups
Red, White and Blue Dirt Cups are a fun and festive dessert that can be enjoyed in various ways. Here are some creative serving suggestions to make your dessert stand out at any gathering.
Individual Party Favors
- Serve each Red, White and Blue Dirt Cup in clear plastic cups for an attractive presentation. These cups are perfect for parties and easy to grab.
Themed Dessert Table
- Create a dessert table featuring these cups alongside other Patriotic treats. This will create an inviting atmosphere for guests to enjoy.
Kids’ Birthday Parties
- Incorporate these cups into a birthday party theme. They can be a great highlight, especially for summer birthdays celebrating around the 4th of July.
Backyard Barbecues
- Bring these dirt cups to outdoor gatherings. Their vibrant colors match the festive spirit, making them a crowd-pleaser.
Family Movie Night
- Enjoy these delicious cups during family movie nights. Their fun presentation adds excitement to your cozy evening at home.
School Celebrations
- Share these treats during school functions or events. The kids will love their colorful appearance and sweet taste!
How to Perfect Red, White and Blue Dirt Cups
To ensure your Red, White and Blue Dirt Cups turn out perfectly every time, follow these helpful tips.
- Use cold milk: Make sure your milk is cold before mixing it with the pudding. This helps achieve a thicker consistency for your layers.
- Layer carefully: To create distinct layers, spread each layer gently with a spoon or spatula without mixing the colors together.
- Chill before serving: Refrigerate the completed cups for at least 30 minutes before serving to enhance the flavors and firm up the pudding.
- Garnish creatively: Add extra toppings like whipped cream or berries on top for added flair and flavor.
Best Side Dishes for Red, White and Blue Dirt Cups
Pairing side dishes with your Red, White and Blue Dirt Cups can enhance your event’s theme. Here are some delightful options:
- Grilled Veggie Skewers: Colorful skewers filled with grilled vegetables complement the festive vibe while being healthy.
- Patriotic Fruit Salad: A mix of blueberries, strawberries, and bananas makes a refreshing side that matches the color scheme.
- Corn on the Cob: Grilled or boiled corn is a classic summer favorite that pairs well with desserts.
- Burgers or Hot Dogs: Offer classic American favorites as the main dish; they are always popular at gatherings.
- Potato Salad: A creamy potato salad can serve as a hearty side that balances out the sweetness of the dirt cups.
- Caprese Salad Skewers: Cherry tomatoes, mozzarella balls, and basil add a fresh touch that contrasts nicely with sweet desserts.
- Tortilla Chips with Salsa: A crunchy snack option that provides a savory contrast to your sweet cups.
- Watermelon Slices: Juicy watermelon adds hydration and a sweet touch without overpowering other flavors.
These sides will not only complement your dessert but also create an enjoyable dining experience for everyone!
Common Mistakes to Avoid
When making Red, White and Blue Dirt Cups, it’s easy to slip up. Here are some common mistakes to watch for.
- Not whisking thoroughly: Make sure to whisk the pudding mix and milk until it thickens completely. This ensures a smooth texture in your dessert.
- Skipping the layering steps: Each layer is crucial for visual appeal. Follow the order of layers to achieve the patriotic look.
- Using warm ingredients: Ensure that all ingredients, especially milk, are cold when mixing. This helps the pudding set properly.
- Overfilling the cups: Stick to the recommended measurements for each layer. Overfilling can lead to messy cups and overflow.
- Forgetting decorations: Don’t skip adding gummy worms and flags. These toppings enhance both flavor and presentation.
Storage & Reheating Instructions
Refrigerator Storage
- Store in airtight containers or cover cups with plastic wrap.
- Keep in the refrigerator for up to 3 days.
Freezing Instructions
- Use freezer-safe containers: If you want to freeze leftovers, use containers that can withstand low temperatures.
- Freeze for up to 2 months, but note that texture may change upon thawing.
Reheating Instructions
- Oven: Preheat to 350°F (175°C) and warm for about 10 minutes. Check frequently as you do not want to cook the dessert.
- Microwave: Heat in short bursts of 15-20 seconds until slightly warm. Avoid overheating as it may alter the texture.
- Stovetop: Use a saucepan on low heat, stirring gently until warmed through.
Frequently Asked Questions
What are Red, White and Blue Dirt Cups?
Red, White and Blue Dirt Cups are fun, layered desserts made with cheesecake pudding, crushed Oreos, and vibrant red and blue food coloring.
How long does it take to make Red, White and Blue Dirt Cups?
The total time for preparation is just 10 minutes. It’s an easy no-bake dessert perfect for gatherings!
Can I customize my Red, White and Blue Dirt Cups?
Absolutely! Feel free to add different candies or fruits between layers for unique flavors while keeping the patriotic theme.
Are Red, White and Blue Dirt Cups a good choice for kids?
Yes! This dessert is not only visually appealing but also fun for kids to help assemble.
Can I make these desserts ahead of time?
Yes! You can prepare them a day in advance and store them in the fridge until serving.
Final Thoughts
Red, White, and Blue Dirt Cups are an exciting dessert that will impress at any gathering. Their vibrant colors make them perfect for patriotic celebrations like the 4th of July. Don’t hesitate to customize this recipe with your favorite toppings or layer combinations!
Article Category: DESSERTS
SEO Information
SEO Title: Patriotic Delight: Red, White and Blue Dirt Cups
Meta Description: Enjoy festive Red, White and Blue Dirt Cups—perfect for summer celebrations! Easy to make with layers of flavor. Try this fun recipe today!
Synonyms/Keywords: patriotic desserts, colorful layered treats, no-bake desserts for kids, Fourth of July sweets, festive dirt cups, fun pudding recipes, layered Oreo desserts, summer party treats, gummy worm dessert cups, easy holiday treats, American flag desserts, quick festive snacks, creamy cheesecake cups, celebratory desserts for kids, vibrant dessert ideas, holiday party recipes

Red, White and Blue Dirt Cups
Red, White, and Blue Dirt Cups are a festive no-bake dessert that embodies the spirit of celebration, making them perfect for summer gatherings like the 4th of July. These delightful layered cups combine creamy cheesecake pudding with crunchy crushed Oreos, topped with colorful red and blue hues that will draw everyone in. With minimal preparation time and a fun presentation, these treats are not only delicious but also a fantastic way to engage kids in the kitchen. Whether you’re hosting a backyard barbecue or celebrating a patriotic event, these dirt cups are sure to be a crowd-pleaser.
- Total Time: 0 hours
- Yield: Serves 6
Ingredients
- Cheesecake pudding mix
- Milk
- Crushed Oreo cookies
- Red and blue gel food coloring
- Red and blue gummy worms
- Clear plastic cups (9oz)
Instructions
- In a large mixing bowl, whisk together the cheesecake pudding mix and cold milk until thickened.
- Divide the pudding into two bowls; color one with blue food coloring and leave the other white.
- In clear plastic cups, layer 1 tablespoon of crushed Oreos, followed by 2 tablespoons of blue pudding, another tablespoon of Oreos, 3 tablespoons of white pudding, 1½ tablespoons more of white pudding, and finally 4 tablespoons of red pudding on top.
- Finish each cup with more crushed Oreos, two gummy worms, and a flag topper for decoration.
- Prep Time: 10 minutes
- Cook Time: None
- Category: Dessert
- Method: No-bake
- Cuisine: American
Nutrition
- Serving Size: 1 cup (150g)
- Calories: 250
- Sugar: 18g
- Sodium: 210mg
- Fat: 10g
- Saturated Fat: 5g
- Unsaturated Fat: 3g
- Trans Fat: 0g
- Carbohydrates: 36g
- Fiber: 2g
- Protein: 3g
- Cholesterol: 15mg

Leave a Comment