
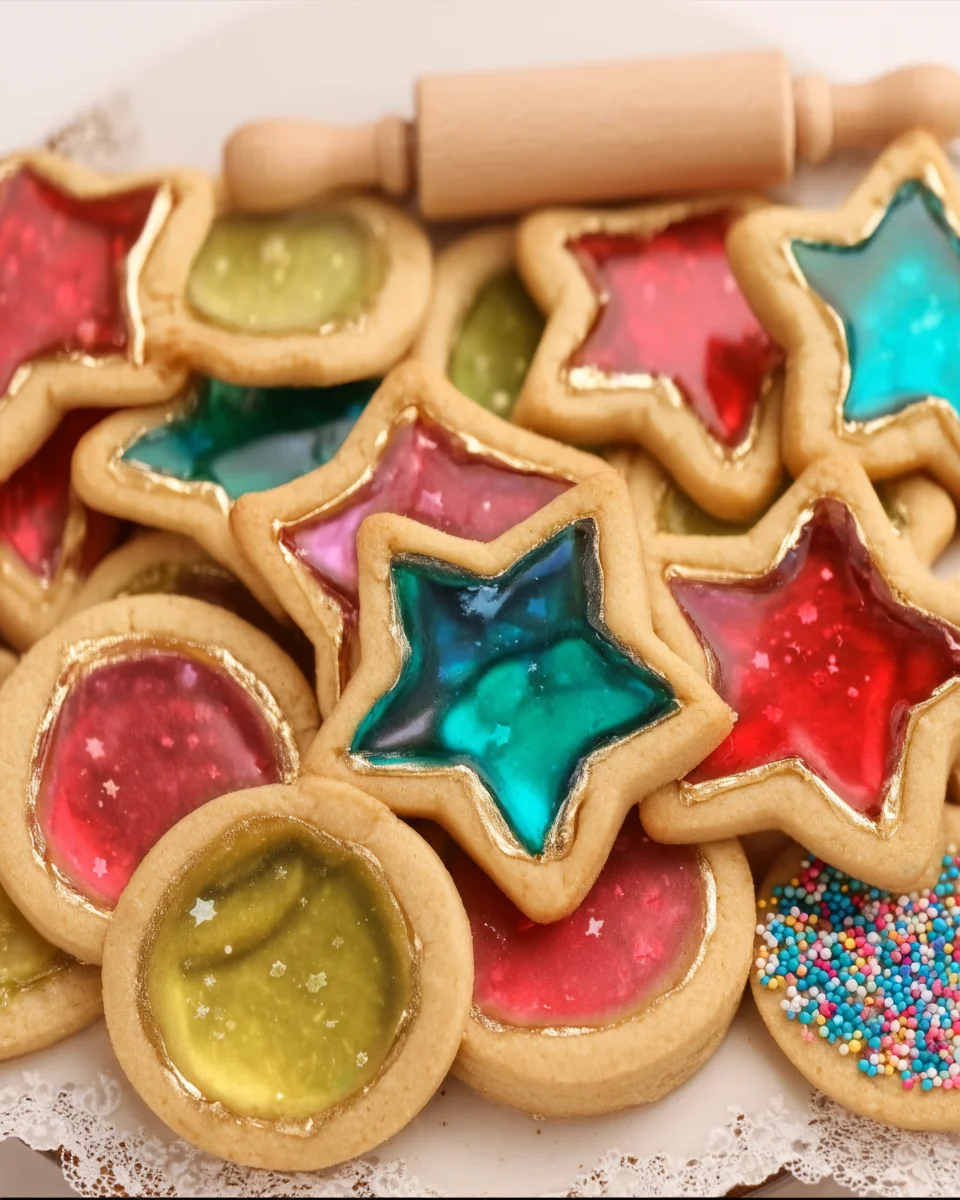
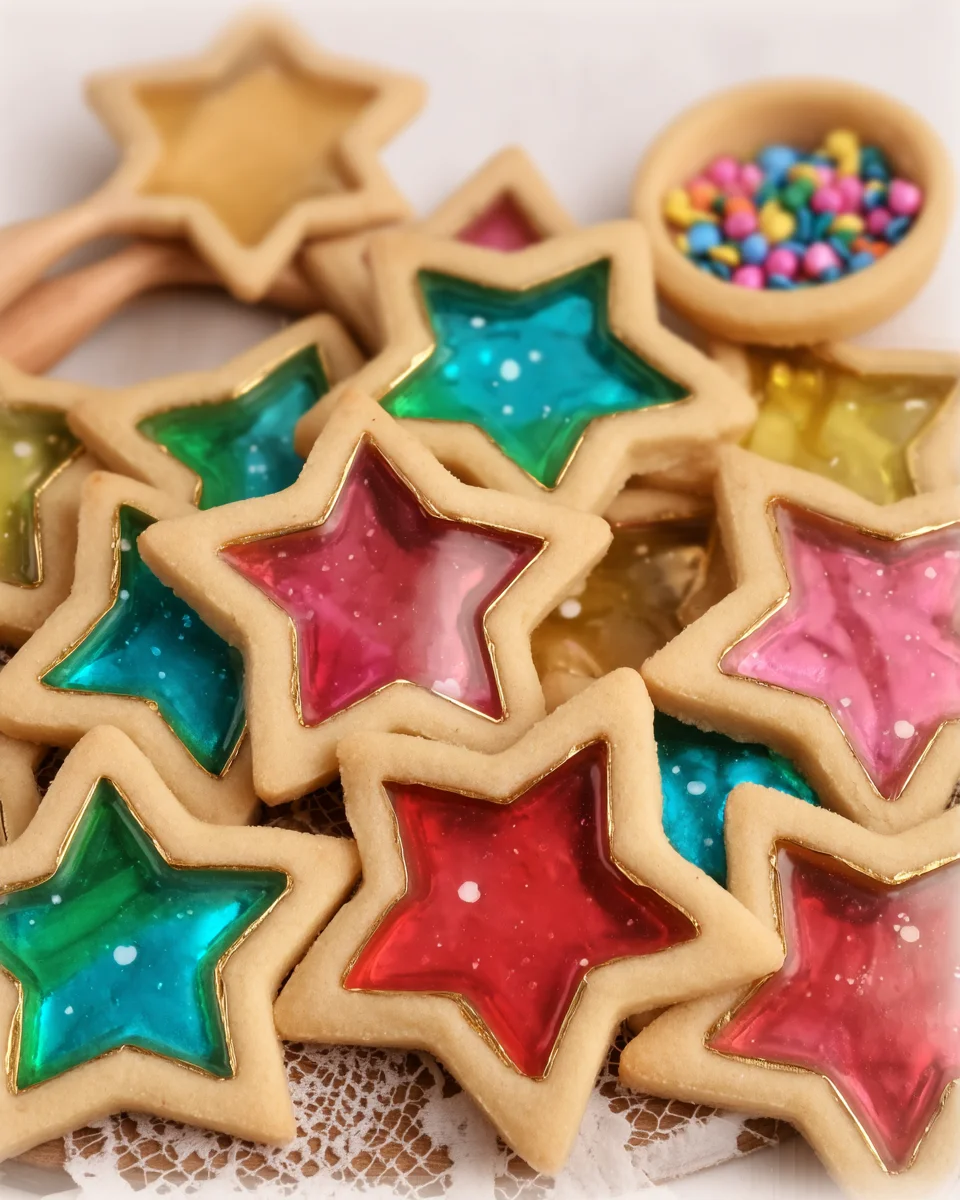
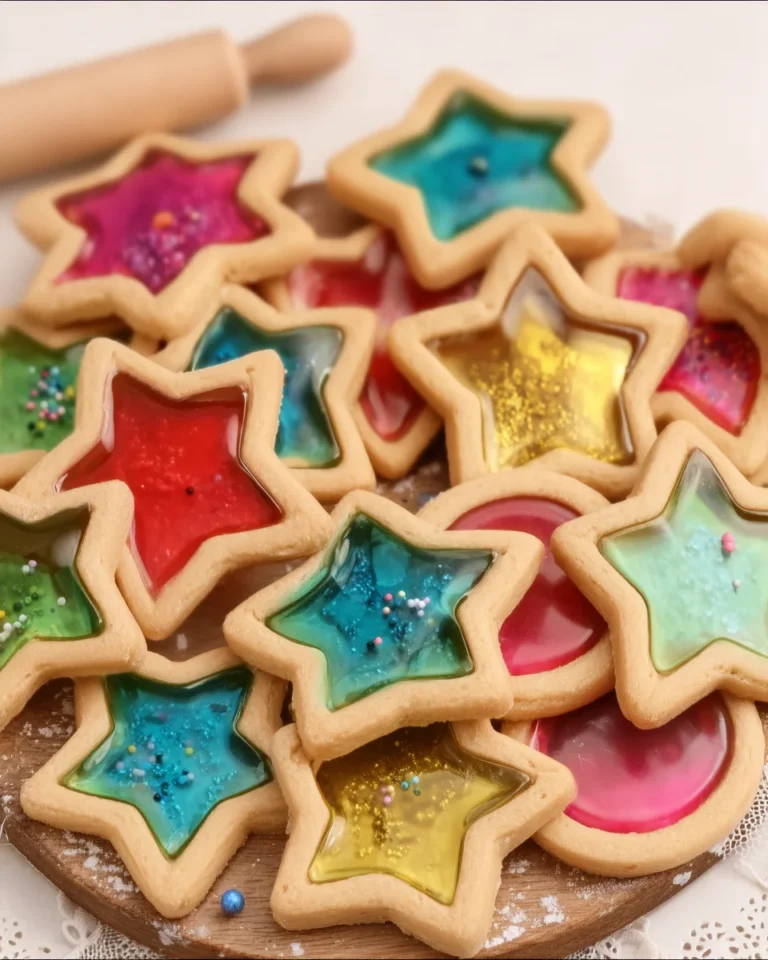
Delight in the colorful beauty of stained glass cookies! These sweet, buttery treats are not only delicious but also a feast for the eyes. Each cookie showcases vibrant candies melted to create stunning stained glass effects that will charm both kids and adults alike. Perfect for holidays, parties, or just a fun baking day at home!

Why You’ll Love This Recipe
- Visually Stunning: The bright colors of the melted candies create a striking appearance that will impress anyone.
- Simple to Make: With straightforward steps and common ingredients, these cookies are easy enough for beginners.
- Customizable Flavors: You can mix and match different hard candies to suit your taste or theme.
- Fun for All Ages: Involve kids in the process of rolling dough and filling cookies with candy for a memorable baking experience.
- Perfect for Any Occasion: Whether it’s Christmas, birthdays, or any celebration, these cookies fit right in!
Tools and Preparation
Before diving into the recipe, gather your tools to ensure a smooth baking experience. Having everything ready will make the process enjoyable.
Essential Tools and Equipment
- Baking sheets
- Parchment paper
- Mixing bowls
- Rolling pin
- Cookie cutters
- Plastic wrap
Importance of Each Tool
- Mixing bowls: Essential for combining ingredients effectively without making a mess.
- Cookie cutters: Help you create fun shapes and designs that add flair to your stained glass cookies.
Ingredients
For the Dough
- 2 ¾ cups all-purpose flour
- 1 teaspoon baking powder
- ¼ teaspoon salt
- 1 cup unsalted butter, softened
- 1 cup granulated sugar
- 1 large egg
- 2 teaspoons vanilla extract
- ½ teaspoon almond extract (optional)
For the Candy Filling
- ½ cup assorted hard candies (e.g., Jolly Ranchers, Life Savers)
How to Make Stained Glass Cookies
Step 1: Prepare the Dough
In a bowl, whisk together the flour, baking powder, and salt. In a separate large mixing bowl, cream together the softened butter and granulated sugar until light and fluffy. Add the egg, vanilla extract, and almond extract, mixing well. Gradually add the dry ingredients until combined.
Step 2: Chill the Dough
Divide the dough in half and shape each half into a disc. Wrap in plastic wrap and refrigerate for at least 1 hour or until firm.
Step 3: Preheat the Oven
Preheat your oven to 350°F (175°C). Line baking sheets with parchment paper.
Step 4: Roll Out the Dough
On a lightly floured surface, roll out one disc of chilled dough to about ¼ inch thick. Use cookie cutters to cut out cookies, making sure to use a smaller cutter in the center to create the ‘glass’ shape.
Step 5: Add the Candy
Crush the assorted hard candies into small pieces. Place the cookie cutouts on the prepared baking sheets. Fill the centers of each cookie with the crushed candies.
Step 6: Bake
Bake the cookies in the preheated oven for 8-10 minutes or until the edges are lightly golden. The candy will melt to create the stained glass effect.
Step 7: Cool and Serve
Allow the cookies to cool completely on the baking sheets before carefully transferring them to a wire rack. Enjoy your colorful creations!
How to Serve Stained Glass Cookies
Stained glass cookies are a delightful treat that can brighten any occasion. Their colorful appearance and sweet flavor make them perfect for sharing at parties or family gatherings. Here are some fun ways to serve these eye-catching cookies.
Cookie Platters
- Arrange the stained glass cookies on a decorative platter to showcase their vibrant colors. This makes for an appealing centerpiece at any gathering.
Gift Bags
- Package individual cookies in clear cellophane bags tied with a ribbon. These make thoughtful gifts for friends and loved ones, especially during holidays.
Ice Cream Sandwiches
- Use two stained glass cookies to create a colorful ice cream sandwich. Choose your favorite ice cream flavor for a fun twist on dessert.
Party Favors
- Incorporate stained glass cookies into party favor bags for celebrations like birthdays or weddings. They will surely leave guests with a sweet memory of the event.
Themed Treats
- Match the colors of your stained glass cookies to the theme of your gathering, such as red and green for Christmas or pastels for Easter.
How to Perfect Stained Glass Cookies
Creating stunning stained glass cookies is an art. Follow these tips to make sure your cookies turn out perfectly every time.
- Chill the Dough: Make sure to chill the dough thoroughly before rolling it out. This helps prevent the cookies from spreading too much while baking.
- Use Fresh Candies: Opt for fresh hard candies for the best melting results. Stale candies may not melt properly and could affect the appearance of the stained glass effect.
- Cut Even Shapes: Use cookie cutters that are uniform in size for a consistent look. This will ensure even baking and easier stacking after they cool.
- Watch Baking Time: Keep an eye on the cookies while they bake. Remove them when the edges are lightly golden to avoid overbaking, which can affect texture.
- Cool Completely: Allow the cookies to cool fully on wire racks before serving or storing. This prevents them from becoming soggy due to trapped moisture.
Best Side Dishes for Stained Glass Cookies
Stained glass cookies are a delightful treat that pairs well with various side dishes, enhancing your dessert table’s appeal. Here are some tasty options to consider serving alongside these colorful confections.
- Fruit Salad: A refreshing blend of seasonal fruits adds a healthy touch and balances out the sweetness of the cookies.
- Cheese Platter: Offer a selection of cheeses that contrast nicely with the sweetness, providing guests with both savory and sweet options.
- Chocolate Fondue: Set up a chocolate fondue station where guests can dip pieces of fruit or cookie pieces into warm melted chocolate.
- Mini Cupcakes: Serve an assortment of mini cupcakes in different flavors, complementing the visual appeal of your stained glass cookies.
- Milk or Hot Cocoa: Provide beverages like milk or hot cocoa as delightful accompaniments that pair perfectly with these sweet treats.
- Ice Cream Sundae Bar: Create a fun sundae bar where guests can customize their desserts with toppings, including crumbled stained glass cookies!
Common Mistakes to Avoid
When making stained glass cookies, even small errors can affect the final result. Here are some common mistakes to watch out for:
- Incorrect Cooling Time: Not allowing the cookies to cool completely on the baking sheet can lead to breakage. Always wait for them to cool fully before moving them.
- Skipping the Chilling Step: If you skip chilling the dough, it may spread too much while baking. Be sure to refrigerate the dough for at least one hour.
- Not Crushing Candies Properly: Using large pieces of candy can result in uneven melting. Make sure to crush your hard candies into small, uniform pieces.
- Using Unmeasured Ingredients: Baking is a science. Always measure your ingredients accurately to ensure the perfect texture and flavor.
- Overbaking: Baking too long can burn the edges and ruin the stained glass effect. Keep an eye on them during baking; they should be lightly golden.
Refrigerator Storage
- Store cooled stained glass cookies in an airtight container.
- They will stay fresh for up to 5 days when kept in the refrigerator.
Freezing Stained Glass Cookies
- You can freeze these cookies for longer storage.
- Place them in a freezer-safe container or wrap them tightly with plastic wrap.
- They will last for up to 3 months in the freezer.
Reheating Stained Glass Cookies
- Oven: Preheat your oven to 300°F (150°C) and warm cookies for about 5 minutes for a fresh taste.
- Microwave: Heat each cookie for about 10-15 seconds on low power. Be careful not to overheat as this could melt the candies again.
- Stovetop: Place a pan on low heat and warm cookies briefly, ensuring they don’t get too hot.

Frequently Asked Questions
What are Stained Glass Cookies?
Stained glass cookies are delightful treats made from a buttery cookie base filled with melted hard candies that resemble stained glass windows.
How do I make stained glass effects more vibrant?
To enhance the colors, use bright-colored hard candies like Jolly Ranchers or Life Savers. Experimenting with different colors can create stunning effects!
Can I customize my Stained Glass Cookies?
Absolutely! You can use various shapes and colors of candy or even add sprinkles before baking for extra flair.
Are Stained Glass Cookies good for special occasions?
Yes! These colorful cookies are perfect for holidays, birthdays, or any festive gathering, bringing joy and charm to your celebrations.
How do I store leftover Stained Glass Cookies?
Store any leftover cookies in an airtight container at room temperature or refrigerate them for longer freshness.
Final Thoughts
Stained glass cookies are not only visually appealing but also a fun treat that everyone loves! Their versatility allows you to customize flavors and colors, making them perfect for any occasion. Try this delightful recipe today and enjoy creating beautiful memories in your kitchen!
Stained Glass Cookies
Indulge in the whimsical charm of stained glass cookies, where vibrant candies transform buttery cookies into delightful works of art. These colorful treats are perfect for any occasion, whether it’s a festive celebration or a fun day of baking at home. Kids and adults alike will be enchanted by their stunning appearance and sweet flavor. With easy-to-follow steps and simple ingredients, you’ll be able to create these eye-catching cookies that are sure to impress your family and friends.
- Total Time: 30 minutes
- Yield: Approximately 24 cookies 1x
Ingredients
- 2 ¾ cups all-purpose flour
- 1 teaspoon baking powder
- ¼ teaspoon salt
- 1 cup unsalted butter, softened
- 1 cup granulated sugar
- 1 large egg
- 2 teaspoons vanilla extract
- ½ cup assorted hard candies (like Jolly Ranchers)
Instructions
- Prepare the Dough: In a bowl, mix flour, baking powder, and salt. In another bowl, cream together butter and sugar until fluffy. Add egg and extracts; mix well. Gradually add dry ingredients until combined.
- Chill the Dough: Divide dough into two discs, wrap in plastic wrap, and refrigerate for at least 1 hour.
- Preheat the Oven: Set oven to 350°F (175°C) and line baking sheets with parchment paper.
- Roll Out the Dough: On a floured surface, roll out one disc to about ¼ inch thick. Use cookie cutters to cut shapes; use a smaller cutter for the center.
- Add Candy: Crush hard candies into small pieces and fill the centers of each cookie cutout.
- Bake: Bake for 8-10 minutes until edges are lightly golden. Allow cookies to cool before transferring them to a wire rack.
- Prep Time: 20 minutes
- Cook Time: 10 minutes
- Category: Dessert
- Method: Baking
- Cuisine: American
Nutrition
- Serving Size: 1 serving
- Calories: 130
- Sugar: 10g
- Sodium: 40mg
- Fat: 7g
- Saturated Fat: 4g
- Unsaturated Fat: 2g
- Trans Fat: 0g
- Carbohydrates: 15g
- Fiber: <1g
- Protein: 1g
- Cholesterol: 25mg

Leave a Comment